28/05/23

Geomagic Control X is a powerful software solution for quality control and inspection in the manufacturing and engineering industries. It can do what traditional measurement methods cannot (for example, coordinate measuring machines and vernier calipers cannot effectively obtain complete data in the face of inspection of parts that are prone to deformation or bending). Geomagic Control X helps companies quickly and easily verify the accuracy of their products and ensure compliance with industry standards.
The key role of Geomagic Control X is its ability to digitally present 3D models of physical parts, which allows users to quickly capture highly detailed and accurate digital representations of their products for use in inspection and analysis.
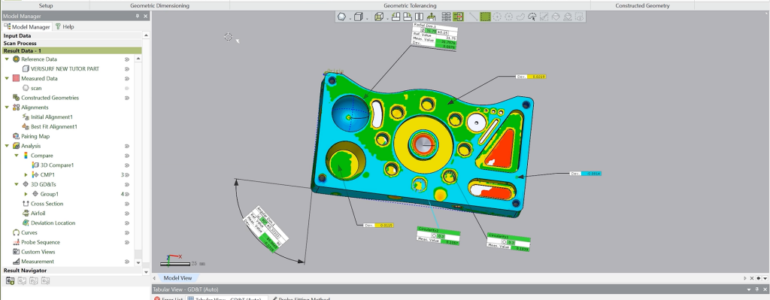
First, we imported the data scanned using FreeScan UE Pro and the CAD data of the product to control X, and then used the “Best Fit Alignment” feature. This tool allows users to align the scan of the object with the CAD model of the object, ensuring that the two models are in the same position and orientation to compare.
Next, we used the “3D compare” function, where we can set the acceptable max deviation and specific tolerance between the scanned data and the CAD model.
Any differences that exceed the defined tolerance will be highlighted on the chromatogram, making the area that needs further inspection easily identifiable. The darker the color, the greater the deviation between the scan data and the cad file. If you want to know the exact deviation of a point, simply use the comparison point tool to display the specific deviation value.
In addition, the “Dimension” feature is a useful tool in Control X that allows users to measure specific dimensions of a 3D model, such as length, width, height and diameter. Users can measure the angle between two lines or planes using “Angular Dimension“. This function is utilized to determine whether the angles of the workpiece’s surfaces or lines correspond to those in the CAD file. “Radial Dimension” allows users to measure the radius of a circular feature such as holes or curved surfaces. This can be useful for checking that holes are the correct size or that surfaces are the correct radius.
Overall, Geomagic Control X is the ideal choice for improving product quality and efficiency.